Conflicts

Conflicts dialog emerges if you have conflict with at least one settings item in your project (material or printer or profile). Conflict means that you already have in your Aura settings an item with the same name but with differing settings. For example, you already have Plastics material named “PLA” and flow multiplier = 1. And you want to load the project which contains material “PLA”, and this material has flow multiplier = 1.1. So, this is the conflict and you should solve it before you can continue to work with slicer. You can do it with the Conflict dialog.

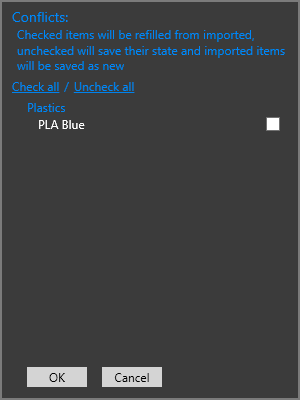
  • To override your local settings check a checkbox for appropriate settings.
  • To add the settings from the project as a copy uncheck a checkbox for appropriate settings.

Session

Session is the settings aggregator. You should specify printer, profile, materials in extruders, and choose extruder for each print entity. The part settings that you can see at the bottom of session panel can be adjusted individually for each print. Besides, this settings are not taken into account during profile comparison and conflict determination. So if you load a project from a file, this settings are always overrrided without conflict.

After you’ve configurated session you can press a generate button. If the generate button is disabled check that you have loaded model for slicing and your models have no intersection between themselves.

Settings

Aura has modular settings system. It means that you have 4 settings modules – plastics, fibers, printers and profiles. These modules are combined in a session, which contains all parameters required for slicing process. Session contains one printer, one or several plastic and fiber materials and one profile.

For each item you can set Name, Version and Description. Item names should be unique. Keep in mind that item name is important to compare settings in case of conflict.

  • Some items have approved mark. APproved mark means that this settings are approved by Anisoprint. Approved items can’t be modified, but it doesn’t stop you from experiments. If you want to make any changes, you can copy the approved settings. You can find AP mark on the right of settings name in settings list.
  • You can delete any non-approved (without AP mark) settings item. Just click on a delete button. If you are trying to remove item which is using by the session you will see a warning.
  • You can duplicate any settings item. Just click on a duplicate button. Duplication creates a full copy of your settings item.
  • You can export any settings item. Just click on a export button. Each settings type has own file format.
  • You can find information about any parameter by clicking on a question mark on the right from the parameter name.
  • You can add new item to list. Just click on an add button, and you will see a new item in a list. Item will be filled with default values.
  • You can import a set of settings. Just click on a import button.
  • You can export all settings from your list . Just click on a export button.

Main window

When you open Aura the main window appears.

Main window

First thing that you may want to do in Aura is to load 3D model of a part. Aura supports *.stl, *stp, *.3ds and *.obj file formats.

  • To load model choose File > Open and then select a model in open file dialog. Also you can press Ctrl+M to call model open dialog.

After you have loaded model it appears on a build plate. Now you can save a project. Project is the combination of session settings (profile + printer + materials), models on a build plate and their layup settings. Project has *.auproj format.

  • To save project choose File > Save project as menu item, specify filename and press Save. Or click File > Save (Ctrl + S) to overwrite the current project.
  • To load project choose File > Open project (Ctrl + P). If loaded project has conflicts with current session a conflict dialog will appear.