Printing the Bracket

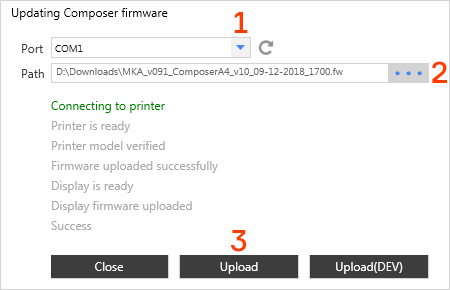
Test part “Wall bracket” introduces you to capabilities of your Composer A4 and also serves as a combined quality test. You can find the gcode for this test preloaded on your Composer SD, or download it from Anisoprint Support Portal / Printing tests page. Choose the code sliced for the particular filament you have.

  • Use recommended adhesive for you plastic filament, e.g. Magigoo Original for transparent PETG, or Magigoo PA for Smooth™PA.
  • After print start, both extruders, plastic and composite, start to heat. When composite extruder reaches extrusion temperature, composite nozzle will print a short purge line(composite thread) in front of the build plate. It must be glued to the surface and look smooth and uniform. At the end of printing the purge line you will hear a characteristic sound of the fiber cutter.
  • After printing the purge line, the machine will start with the first plastic layer. Check if the plastic perimeters look the same everywhere along the part. The first layer must be nicely glued to the build plate. At the same time, wipe tower will be started on the left side of the build plate.
  • After several plastic layers, the machine will go the first fiber perimeter and fiber cellular infill. Due to the process features, it may look a bit wobbly, but the layup visual quality will normalize later on. If the fiber goes off trajectory or doesn’t glue to the previous layer, check your Z-offset calibration.
  • During the next plastic-composite cycles, fiber perimeters will be surrounded by plastic ones. Make sure the plastic and fiber perimeters do not intersect, and fiber perimeters are laid without displacements.

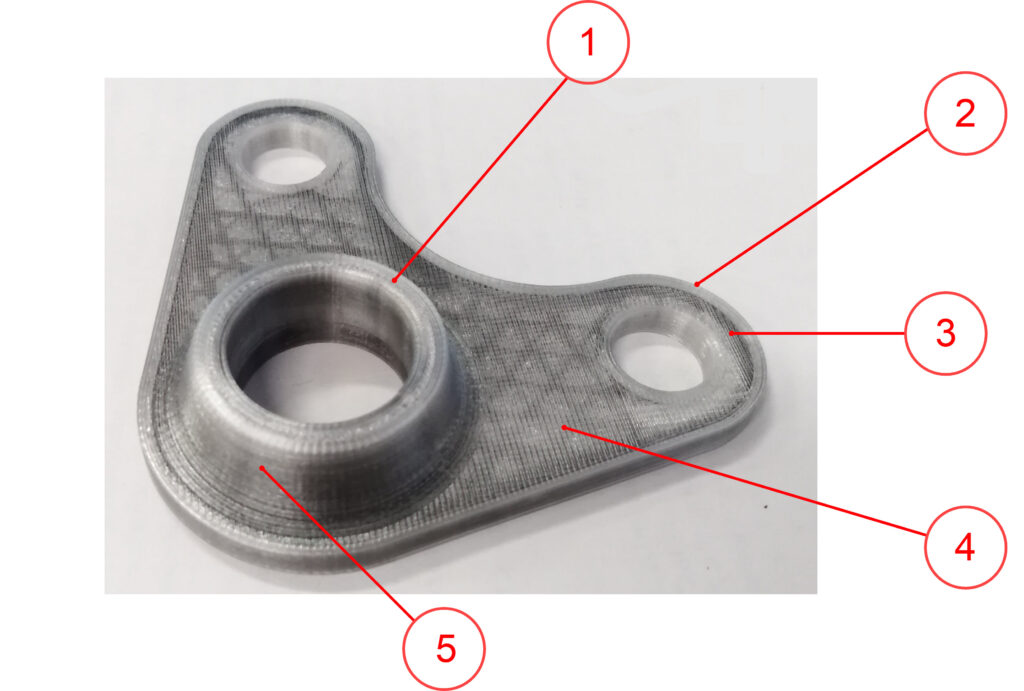
Inspect the printed part, paying special attention to side walls quality. Check the surface smoothness visually. The typical print quality will be similar to the photo below:

1 – Plastic top solid infill(cover), 2 – outer plastic perimeters, 3 – fiber perimeters, 4 – cellular fiber infill, 5 – plastic shell

Buildplate preparation

  1. Unpack the printing glass, apply an adhesive varnish evenly to the top surface, place it on the buildplate and fix with the clamping clips.
  2. Calibrate the buildplate via automatic procedure in Maintenance > Calibarate > Buildplate.
  3. Calibrate the Z-axis via automatic procedure in Maintenance > Calibrate Z-axis.
  4. Start the XY offset test by choosing Print > NozzleOffsetTest.gcode on the printer screen. The test procedure is described in detail in the Maintenance section.

Loading materials

  1. Take the 3 coils(Plastic, Composite Plastic and Fiber) out of dry bags and place them onto the holders.
  2. On the Composer screen, click Maintenance > Materials > and choose the material you want to load. Follow instructions on the screen. It is strongly suggested to load the composite plastic filament before the fiber.

Installation

Your Composer A4 printer requires several assembly steps to be performed before you start printing.

Unpack the printer and place it on a reliable flat surface, protected from strong vibrations. Adjust the printer feet to compensate for any unevenness of the surface if needed.

  • Using a hex key from the Supply Kit, attach the coil holders to the back mount of the printer
  • Install the wipe station part on the station bracket on the right. Size and color may vary by model.
  • Unpack the printing glass, apply an adhesive varnish evenly to the top surface, place it on the buildplate and fix with the clamping clips.
  • Plug in the power cord.

Composer firmware update

The latest Composer firmware can be downloaded here.

To update printer firmware you can use Anisoprint Aura. Install and launch Aura.

If you connect Composer to your PC for the first time you may need to install the USB driver. To install the driver unzip the archive and run dpinst-amd64.exe if you have 64-bit OS or dpinst-x86.exe if you have 32-bit OS.

Connect the printer to the PC by USB cable. In Aura main menu open Tools > Composer firmware update.

Composer firmware update tool in Aura

In Composer firmware update tool:

  1. In Port list select the COM port of Composer. If you connected Composer to your PC for the first time, it will usually be the last one. If the list is empty or you can’t connect to printer using any listed port, make sure, that you have installed SUB driver mentioned above.
  2. Click on “…” button near Path field and select Composer firmware file.
  3. Press Upload button. 
  4. Wait until all lines including the last “Success” button become green.

Note

Do not disconnect or turn off your printer during firmware update process.

How to unclog an CFC nozzle?

If the fiber from CFC nozzle of your Anisoprint Composer A4 does not extruded, take the following steps to fix this:

1. Check whether the plastic is correctly loaded in the feeder; Whether plastic filament comes to the print-head;

2. Check that the temperature of the composite extruder corresponds to the temperature of the plastic processing for the fiber

When the CFC nozzle for fiber of your Anisoprint Composer A4 is clogged or blocked, take the following steps to fix it:

  1. Heat the composite extruder and trim the fiber using the menu item («Move –  Extruders – U+ » to push the fiber. If the fiber come out push the button «scissors» to cut the fiber
  2. If the fiber does not come out…

How to unclog an FFF nozzle?

If the plastic from FFF nozzle of your Anisoprint Composer A4 does not extruded, take the following steps to fix this:

1. Check whether the plastic is correctly loaded in the feeder; Whether plastic filament comes to the print-head;

2. Check that the temperature of the extruder meets the recommended processing temperature of the plastic;

When the FFF nozzle for plastic of your Anisoprint Composer A4 is clogged or blocked, this will prevent the material from being extruded. This blockage is usually caused by dirt in the hot end. Take the following steps to fix it:

  1. Heat the extruder and clean the nozzle with the supplied needles. Be careful not to push the needle against the sides as this might damage the nozzle on the inside. Simply insert it and take it out and check if any residue comes out of the nozzle.
  2. If none of the above methods helps to resolve the clogged nozzle, there’s a chance that the nozzle will need to be replaced. Unscrew the nozzle from the hot end (after removing the material) and attach the new nozzle to it.

Which materials can be used on Composer A4?

The anisoprinting technology combines two printing technologies FFF-technology and CFC-technology.

For FFF-technology different plastics may be used. The choice of plastic is directly related to the required physicals characteristics of the printed part and a suitable processing temperature range up to 250°C and a diameter of 1.75 mm: PLA, PET-G, PA, PC, PLA, ABS.

We usually recommend to use PETG or PLA (especially if you’re new into 3D printing), as these is the easiest materials to print with due to their technical properties. You only need to be aware that we can’t guarantee the quality of materials not supplied by ourselves.

For reinforcing material, you need to use our special composite carbon fiber Anisoprint CCF which provides high-quality impregnation and adhesion between the polymers and the fiber. Composite fiber is used to reinforce the plastic during fabrication of the part. You are free to try other reinforcing materials, but we can’t guarantee the quality of materials not supplied by ourselves.