Composite fiber channel cleaning

Residual dirt, fiber remnants and degraded plastic are slowly accumulated inside extruder during printing process. To clear the dirt, or remove small fiber pieces from an extruder do the following

  • Using the 2mm hex key from Tool Kit loosen the side screws of fan bracket. Remove the fan bracket carefully, fan bracket stays hang on wires.
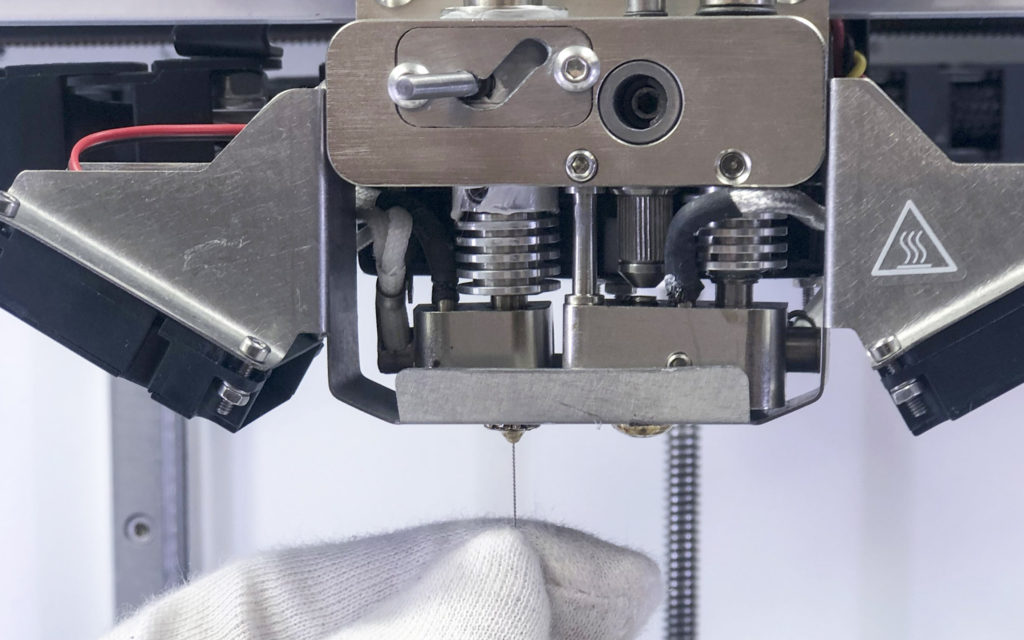
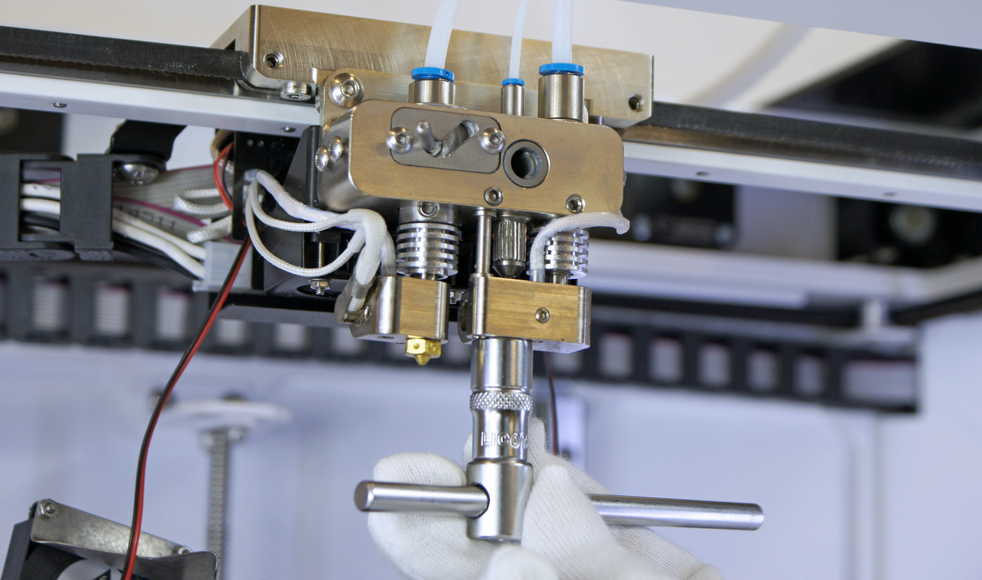
  • Heat the composite extruder up to 200C° . Using the 9 mm socket wrench unscrew the composite nozzle from the composite extruder – turn it clockwise, do not use too much force to avoid damage of the composite nozzle
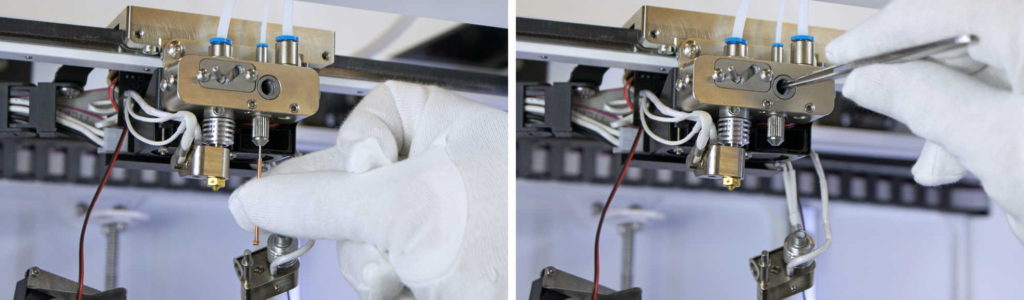
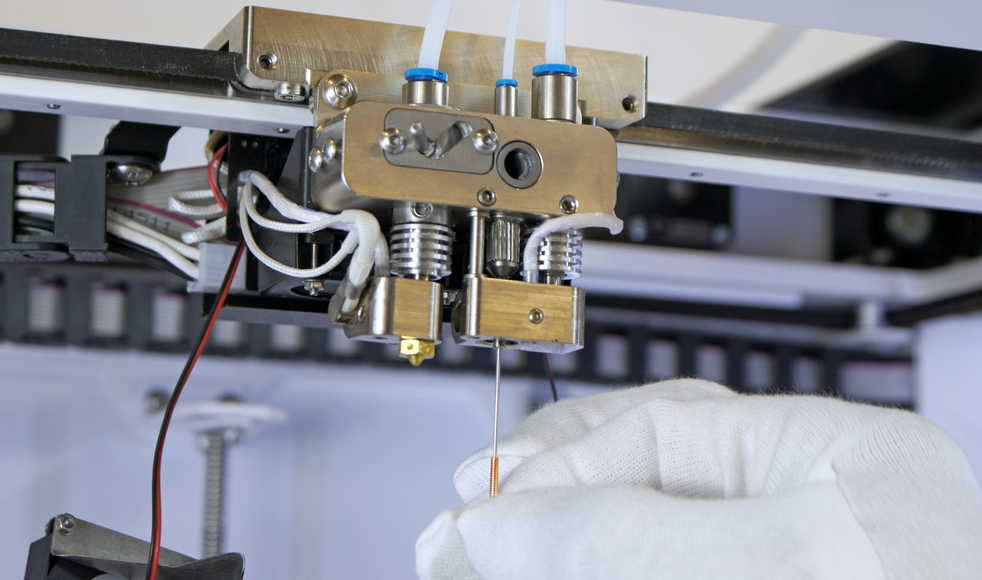
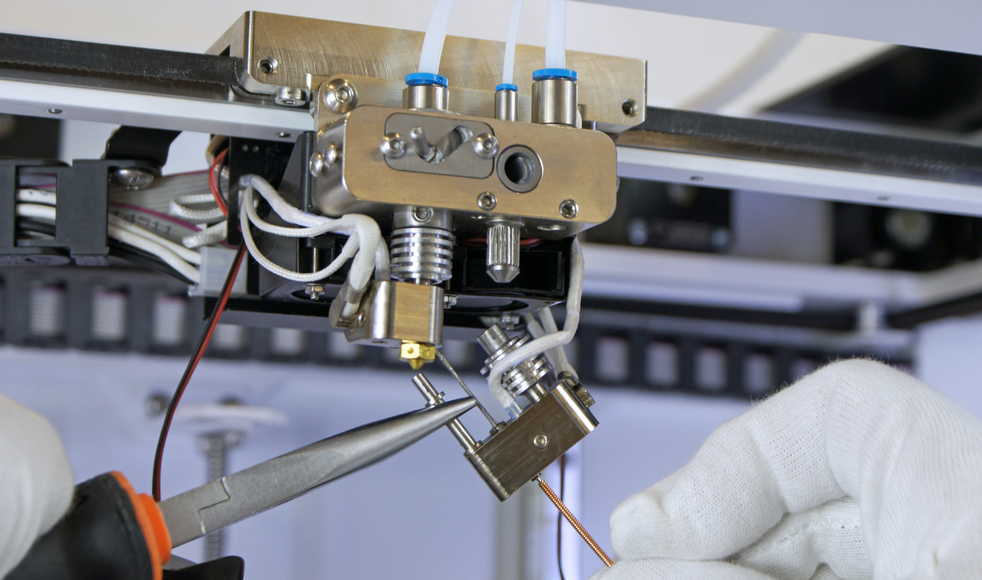
  • Check the сomposite nozzle, there should be no fiber pieces inside. If they are there, remove them with tweezers.
  • Heat composite extruder up to 250C°. Clean the guide tube in composite heater block with cleaning needle from tool kit or you can use any stiff steel wire with 0.8 diameter.

Caution!

Further only In the case of heavy clog.

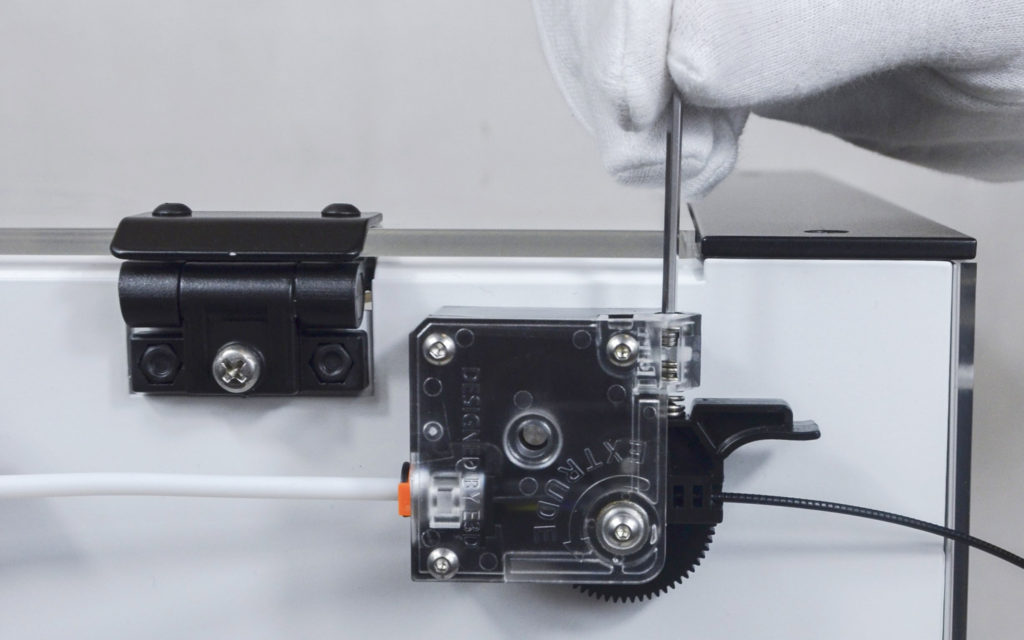
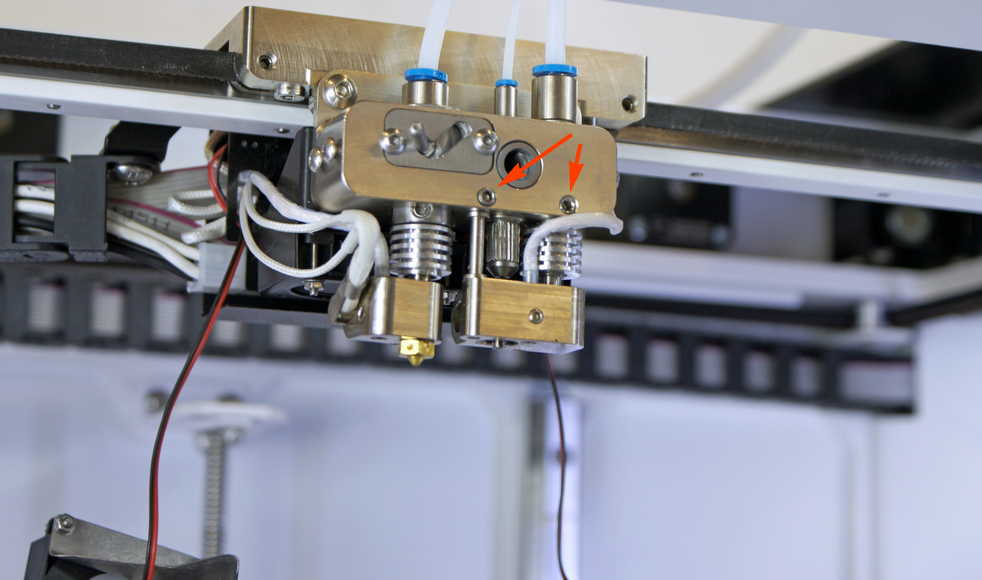
  • Using the 2 mm hex key from tool kit loosen set screws and pull down the composite extruder.
  • Heat composite extruder up to 250C°. Hold it by pliers, and clean the guide tube in composite heater block by cleaning needle.
  • If some fiber remains at cutter sleeve or guide bush – clean it with tweezers.

MAXTEMP

There are two options to get maximum temperature error on the Composer.

  • In standby mode, when you see temperature 989 С° on one of the extruders
  • During printing, when you get MAXTEMP trigger error

This error comes, when Composer get temperature more than 275 C° from one of the extruders (Heater_ID) or more than 125 C° from buildplate.

Caution!

If you set the temperature in gcode more than 275 С° on extruder or more than 125 С° on buildplate, you will get MAXTEMP error, although the printer will work fine.

To identify the cause of the error, you need to check the temperature sensor. Operating procedure will be:

  1. Turn off the printer
  2. Remove the protective cover from the print head
  3. Disable flat cables
  4. Measure the resistance at the defined connectors.

If the measured resistance is close to the correct (108-110 Om), it’s means that the temperature sensor works good. You will need to contact your local distributor or write us on support@anisoprint.com

MINTEMP

There are two options to get minimum temperature error on the Composer.

  • In standby mode, when you see temperature -242 С° on one of the extruders
  • During printing, when you get MINTEMP trigger error

This error comes, when Composer get temperature from one of the extruders (Heater_ID) less than 10 C°

To identify the cause of the error, you need to check the temperature sensor. Operating procedure will be:

  1. Turn off the printer
  2. Remove the protective cover from the print head
  3. Disable flat cables
  4. Measure the resistance at the defined connectors.

If the measured resistance is close to the correct (0.4-1 Om), it’s means that the temperature sensor works good. You will need to contact your local distributor or write us on support@anisoprint.com

Heating errors

When some of heating units is fail, you will see error on screen. All heating errors has ID number, which shows the unit in fail.

  • Heater_ID: 0 – plastic extruder
  • Heater_ID: 1 – composite extruder
  • Heater_ID: 2 – buildplate

Extruders switching

  • After a long and intensive work without maintenance (more than 2-3 months), it is necessary to replace the lubricant in the lifting mechanism, see the assembly instruction.
  • If an unsuccessful switching occurred with cold plastic extruder, its means the plastic has solidified between the extruder and the bracket and blocked the switch. Heat the extruder and clean the bracket.

Plastic feeder

Feeder clicks

On the first layer

  • The buildplate is too close to the nozzle. Following the instructions to adjust the zero level
  • In some cases, retracts cause the click sound, this is normal.

On the next layers:

  • Plastic extruder clogged for some reason, check the problem here
  • Incorrectly selected Aura setup. Try to change parameters to solve over extrusion.
  • The filament could flew off the spool, twisting around the axis.

Plastic extruder

Сlog

  • Check the operation temperature on printer screen, it should be same as recommended by filament manufacture.
  • Most likely you have plastic jam inside the heat break. To solve this problem, you have to disassemble plastic extruder in reverse order than assembly and clean the teflon tube

Under extrusion

  • Clean nozzle hole, using needle from the Tool kit.
  • Very often, the problem with the under extrusion is come from wrong Aura setup. Try to change parameters responsible for the flow
  • The filament could not sufficiently pressed in the feeder, tighten the screw using the key from the kit so that the nut is in the middle

Plastic leak

If the nozzle was not enough tighten, during assemble, plastic could leak along the thread up and down. Please tighten the nozzle as it was shown in the instruction

Fall down

Plastic extruder could fall down if fastern had loosen. Please see assembly instruction to fix this problem

How to insert the filament and composite carbon fiber?

For printing onthe Composer A4 you will need 3 spools: 2 spool with plastic you choose and 1 spool with composite carbon fiber CCF.

Rear side of Composer A4
1 – spool with composite carbon fiber Anisoprint CCF
2 – composite fiber feeder
3 – spool with plastic
4 – plastic feeder

Before you start any print, you need to load filament and composite carbon fiber through the feeder. It’s really important to load the filament correctly to ensure you get the best print results.

Firstly, load the plastic into the plastic feeders:

  1. Press on the guide of the feeder to slack the load spring
  2. Direct plastic into the protective tube
  3. Release the feeder guide

Repeat the same procedure with the second plastic filament feeder.

Thereafter through the items on the Composer A4 display: «Maintenance – Materials – Plastic – Load» following the instructions and load the material.

Secondly, load the composite carbon fiber into the feeder:

  1. Direct composite fiber into the feeder air-fitting. Do not apply significant force to the fiber when loading into the feeder – the composite fiber is fragile and may break. 
  2. Thereafter refer to the screen. Through menu items on the Composer A4 display: «Maintenance – Materials – Comp. Fiber – Load» following the instructions and load the material.

Preparing model

Lorem ipsum dolor sit amet, consectetur adipiscing elit. Suspendisse et semper urna. Nam at dapibus justo. Proin bibendum mauris at justo commodo, non finibus sapien dignissim. Nunc vestibulum, mi sit amet pretium malesuada, massa orci condimentum enim, non dignissim augue lacus vitae felis. Vivamus sit amet odio ac odio sollicitudin commodo. Mauris justo urna, finibus sodales sapien sit amet, consectetur tempus leo. Vivamus quis turpis vitae odio blandit volutpat. Morbi auctor massa lorem, ut ornare tortor condimentum eu. Cras placerat molestie diam, at gravida purus lobortis vel. Quisque purus eros, condimentum eu lorem eleifend, tempus rutrum nibh. Cras rhoncus mollis dui non mollis.

Caption

Morbi tincidunt molestie tempus. Aenean placerat ipsum id ligula iaculis condimentum. Suspendisse mattis libero eget ullamcorper finibus. Nullam porttitor urna vitae nisl vulputate fringilla. Mauris nec dui efficitur, mattis nisl a, condimentum mi. Fusce in tempor eros. Vestibulum in quam lobortis, euismod nunc sit amet, tristique tortor.

Sed non congue neque, non imperdiet quam. Suspendisse in ipsum et orci faucibus vestibulum vitae vitae nunc. Praesent dignissim libero ex. Phasellus tempor finibus tellus, vitae fermentum libero ornare eget. Morbi eu nisl porta, aliquam leo sed, commodo quam. Cras rutrum sapien et augue ullamcorper lobortis. Duis pellentesque varius sapien ac lacinia. Proin efficitur ut ex at blandit. Morbi elit lacus, tempus vitae ex vitae, dignissim gravida purus. In eu justo rhoncus, bibendum lorem eu, facilisis dolor. Sed eget mauris id felis volutpat porttitor. Proin sed magna tincidunt, eleifend nunc in, mattis augue. Sed egestas leo felis, quis blandit purus lacinia sed. Quisque at malesuada mauris, quis venenatis justo.