Settings

Aura has modular settings system. It means that you have 4 settings modules – plastics, fibers, printers and profiles. These modules are combined in a session, which contains all parameters required for slicing process. Session contains one printer, one or several plastic and fiber materials and one profile.

For each item you can set Name, Version and Description. Item names should be unique. Keep in mind that item name is important to compare settings in case of conflict.

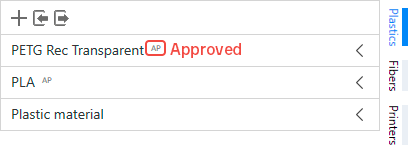
  • Some items have approved mark. APproved mark means that this settings are approved by Anisoprint. Approved items can’t be modified, but it doesn’t stop you from experiments. If you want to make any changes, you can copy the approved settings. You can find AP mark on the right of settings name in settings list.
  • You can delete any non-approved (without AP mark) settings item. Just click on a delete button. If you are trying to remove item which is using by the session you will see a warning.
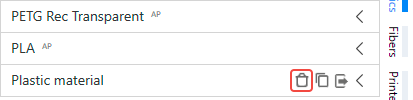
  • You can duplicate any settings item. Just click on a duplicate button. Duplication creates a full copy of your settings item.
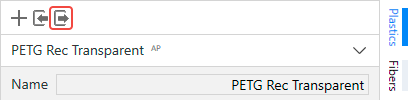
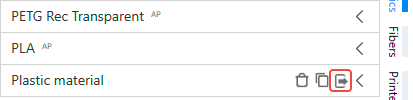
  • You can export any settings item. Just click on a export button. Each settings type has own file format.
  • You can find information about any parameter by clicking on a question mark on the right from the parameter name.
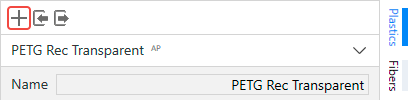
  • You can add new item to list. Just click on an add button, and you will see a new item in a list. Item will be filled with default values.
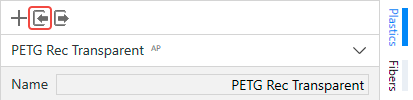
  • You can import a set of settings. Just click on a import button.
  • You can export all settings from your list . Just click on a export button.

Main window

When you open Aura the main window appears.

Main window

First thing that you may want to do in Aura is to load 3D model of a part. Aura supports *.stl, *stp, *.3ds and *.obj file formats.

  • To load model choose File > Open and then select a model in open file dialog. Also you can press Ctrl+M to call model open dialog.

After you have loaded model it appears on a build plate. Now you can save a project. Project is the combination of session settings (profile + printer + materials), models on a build plate and their layup settings. Project has *.auproj format.

  • To save project choose File > Save project as menu item, specify filename and press Save. Or click File > Save (Ctrl + S) to overwrite the current project.
  • To load project choose File > Open project (Ctrl + P). If loaded project has conflicts with current session a conflict dialog will appear.

Composer firmware update

The latest Composer firmware can be downloaded here.

To update printer firmware you can use Anisoprint Aura. Install and launch Aura.

If you connect Composer to your PC for the first time you may need to install the USB driver. To install the driver unzip the archive and run dpinst-amd64.exe if you have 64-bit OS or dpinst-x86.exe if you have 32-bit OS.

Connect the printer to the PC by USB cable. In Aura main menu open Tools > Composer firmware update.

Composer firmware update tool in Aura

In Composer firmware update tool:

  1. In Port list select the COM port of Composer. If you connected Composer to your PC for the first time, it will usually be the last one. If the list is empty or you can’t connect to printer using any listed port, make sure, that you have installed SUB driver mentioned above.
  2. Click on “…” button near Path field and select Composer firmware file.
  3. Press Upload button. 
  4. Wait until all lines including the last “Success” button become green.

Note

Do not disconnect or turn off your printer during firmware update process.

How to unclog an CFC nozzle?

If the fiber from CFC nozzle of your Anisoprint Composer A4 does not extruded, take the following steps to fix this:

1. Check whether the plastic is correctly loaded in the feeder; Whether plastic filament comes to the print-head;

2. Check that the temperature of the composite extruder corresponds to the temperature of the plastic processing for the fiber

When the CFC nozzle for fiber of your Anisoprint Composer A4 is clogged or blocked, take the following steps to fix it:

  1. Heat the composite extruder and trim the fiber using the menu item («Move –  Extruders – U+ » to push the fiber. If the fiber come out push the button «scissors» to cut the fiber
  2. If the fiber does not come out…

How to unclog an FFF nozzle?

If the plastic from FFF nozzle of your Anisoprint Composer A4 does not extruded, take the following steps to fix this:

1. Check whether the plastic is correctly loaded in the feeder; Whether plastic filament comes to the print-head;

2. Check that the temperature of the extruder meets the recommended processing temperature of the plastic;

When the FFF nozzle for plastic of your Anisoprint Composer A4 is clogged or blocked, this will prevent the material from being extruded. This blockage is usually caused by dirt in the hot end. Take the following steps to fix it:

  1. Heat the extruder and clean the nozzle with the supplied needles. Be careful not to push the needle against the sides as this might damage the nozzle on the inside. Simply insert it and take it out and check if any residue comes out of the nozzle.
  2. If none of the above methods helps to resolve the clogged nozzle, there’s a chance that the nozzle will need to be replaced. Unscrew the nozzle from the hot end (after removing the material) and attach the new nozzle to it.

Which materials can be used on Composer A4?

The anisoprinting technology combines two printing technologies FFF-technology and CFC-technology.

For FFF-technology different plastics may be used. The choice of plastic is directly related to the required physicals characteristics of the printed part and a suitable processing temperature range up to 250°C and a diameter of 1.75 mm: PLA, PET-G, PA, PC, PLA, ABS.

We usually recommend to use PETG or PLA (especially if you’re new into 3D printing), as these is the easiest materials to print with due to their technical properties. You only need to be aware that we can’t guarantee the quality of materials not supplied by ourselves.

For reinforcing material, you need to use our special composite carbon fiber Anisoprint CCF which provides high-quality impregnation and adhesion between the polymers and the fiber. Composite fiber is used to reinforce the plastic during fabrication of the part. You are free to try other reinforcing materials, but we can’t guarantee the quality of materials not supplied by ourselves.

How to insert the filament and composite carbon fiber?

For printing onthe Composer A4 you will need 3 spools: 2 spool with plastic you choose and 1 spool with composite carbon fiber CCF.

Rear side of Composer A4
1 – spool with composite carbon fiber Anisoprint CCF
2 – composite fiber feeder
3 – spool with plastic
4 – plastic feeder

Before you start any print, you need to load filament and composite carbon fiber through the feeder. It’s really important to load the filament correctly to ensure you get the best print results.

Firstly, load the plastic into the plastic feeders:

  1. Press on the guide of the feeder to slack the load spring
  2. Direct plastic into the protective tube
  3. Release the feeder guide

Repeat the same procedure with the second plastic filament feeder.

Thereafter through the items on the Composer A4 display: «Maintenance – Materials – Plastic – Load» following the instructions and load the material.

Secondly, load the composite carbon fiber into the feeder:

  1. Direct composite fiber into the feeder air-fitting. Do not apply significant force to the fiber when loading into the feeder – the composite fiber is fragile and may break. 
  2. Thereafter refer to the screen. Through menu items on the Composer A4 display: «Maintenance – Materials – Comp. Fiber – Load» following the instructions and load the material.

Preparing model

Lorem ipsum dolor sit amet, consectetur adipiscing elit. Suspendisse et semper urna. Nam at dapibus justo. Proin bibendum mauris at justo commodo, non finibus sapien dignissim. Nunc vestibulum, mi sit amet pretium malesuada, massa orci condimentum enim, non dignissim augue lacus vitae felis. Vivamus sit amet odio ac odio sollicitudin commodo. Mauris justo urna, finibus sodales sapien sit amet, consectetur tempus leo. Vivamus quis turpis vitae odio blandit volutpat. Morbi auctor massa lorem, ut ornare tortor condimentum eu. Cras placerat molestie diam, at gravida purus lobortis vel. Quisque purus eros, condimentum eu lorem eleifend, tempus rutrum nibh. Cras rhoncus mollis dui non mollis.

Caption

Morbi tincidunt molestie tempus. Aenean placerat ipsum id ligula iaculis condimentum. Suspendisse mattis libero eget ullamcorper finibus. Nullam porttitor urna vitae nisl vulputate fringilla. Mauris nec dui efficitur, mattis nisl a, condimentum mi. Fusce in tempor eros. Vestibulum in quam lobortis, euismod nunc sit amet, tristique tortor.

Sed non congue neque, non imperdiet quam. Suspendisse in ipsum et orci faucibus vestibulum vitae vitae nunc. Praesent dignissim libero ex. Phasellus tempor finibus tellus, vitae fermentum libero ornare eget. Morbi eu nisl porta, aliquam leo sed, commodo quam. Cras rutrum sapien et augue ullamcorper lobortis. Duis pellentesque varius sapien ac lacinia. Proin efficitur ut ex at blandit. Morbi elit lacus, tempus vitae ex vitae, dignissim gravida purus. In eu justo rhoncus, bibendum lorem eu, facilisis dolor. Sed eget mauris id felis volutpat porttitor. Proin sed magna tincidunt, eleifend nunc in, mattis augue. Sed egestas leo felis, quis blandit purus lacinia sed. Quisque at malesuada mauris, quis venenatis justo.